


MS Word is a package in Microsoft office. You might have been having issues in inserting column in Microsoft word..... There is a default width in MS Word but it's very easy to change that default width for each column. Let’s look at those ways you can do that.
How To Set Up Column Width With The Columns Dialog Box
Just note that when you set a Word document to use multiple columns, Word assigns a default column width that depends on the number of columns you choose. Here are those default widths below...

One Column: 6.5″ width for the column. Most people are used to this standard setup when you start typing in a blank document with default page settings. Start with an 8.5″ width for the paper size, take away 1″ on either side for the default page margins, and you’re left with 6.5″ for the actual text.
Two Columns: 3″ width for each column, with a 0.5″ space between columns.
Three Columns: 1.83″ width for each column, with a 0.5″ space between columns and it goes on like that.
Word lets you have up to 13 columns, and the more you add, the less space each column gets.
Among all this column, you can just set the number of columns you want and go about your business. But, you can change things up if you want. Maybe you want smaller columns, with more space in between those columns. Or, maybe you two columns to be a similar size, and then have a smaller column off to the right.
Now, i will be showing you how to do all that using the “Columns” dialog box. This is the best way to set up columns if you don’t yet have any text in your document, or if you know the precise measurements you want to hit. Check it out below..
Read This: Trick To Get Windows 10 Upgrade/Updates on your Window 7&8 PC After Deadline
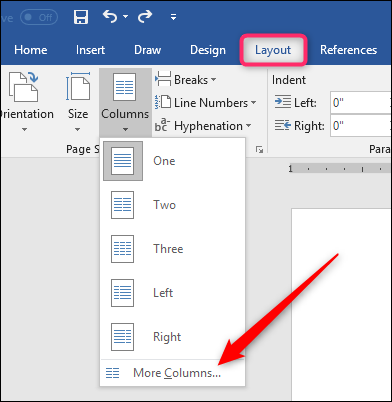
1. When using MS Word column dialog box, you have to switch to the “Layout” tab on the Ribbon. That’s where the column magic happens. Click the “Columns” button and a dropdown menu opens with a number of options.
2. Choose any of the numbers on the list to create that many columns with their default widths. Choose the “Left” or “Right” options to create a two-column layout where the column you chose (left or right) is smaller—about half the size of the other column. It’s the “More Columns” option we’re after here. Click that to set up your own custom column widths.
3. The “Columns” window that pops up lets you perform your customization. The “Presets” section contains the same options you saw on the “Columns” menu.
4. You can also use the “Number Of Columns” box to set a specific number of columns from 1 to 13. So, start by choosing how many columns you want.
5. Select the “Line Between” option to have Word put a vertical line between columns.

6. To actually adjust the column width. If you want your columns to all stay the same width as one another, you can just adjust the number in the “Width” box for column #1... Changes you make there apply to all columns, no matter how many you have. Same goes for spacing. Adjust the number in the “Spacing” box for column#1 to change the spacing between all columns.
7. Note that as you change one value (width or spacing), the other value changes as well. Bump up the width, and the spacing goes down. Bump up the spacing, and the width goes down. You only have so much page width to work with, after all. Here, we set the width down to 1″ and the spacing went up to 1.75″ to compensate.

If you want to control the width of each column individually (making some wider and some narrower), disable the “Equal Column Width” check box.
When you do that, the width and spacing boxes for each column become available, and you can change them however you see fit. Keep in mind that you still have a fixed page width to work with, so adjust the width or spacing for one column will cause the others to change. You may have to work with it a bit to get things how you want them.
See This Also: How to Prevent Windows 10 From Automatically Downloading Updates [Minimize Data Consumption]
Here, we’ve set up three columns. The first two are 2″ in width and the third is smaller at 1.5″. We left a .5″ spacing between all columns.
Note also that you don’t get to adjust spacing for your final column. This makes sense, because the spacing only happens between columns.
How To Change Column Width on the Fly with Word’s Rulers
Now that you’ve seen how to set up column widths using the dialog box , let’s take a look at how you can change them on the fly with the Word ruler. This method is great if you already have columns in your document and you want to play around with widths to see what looks right to you.
>>Firstly, you need to make sure that your document rulers are visible. If you can’t see them, switch to the “View” tab on the Ribbon, and then select the “Ruler” option. Word’s rulers are great for lining things up, keeping tabs on measurements, and controlling indentation and margins. You should really leave them on all the time.
>>Assuming you’ve already got your document set up for two or more margins, look at the horizontal ruler at the top of the page. You can see that there’s a gray space in the middle of the ruler between the two columns.
That represents the spacing between columns that we talked about in the previous section, and it’s defined by two margin markers (the upside-down “L”).
>>Dragging either one of the margin markers changes the size of the spacing, and the margins for the columns themselves. For example, if you slide the left margin marker to the left, the right maring marker automatically moves to the right, increasing the size of the spacing between those margins. The columns of text in your document change as you do this, too, giving you instant feedback on how the changes will look.
Here, we’ve dragged it it so the spacing is much greater than the default, leaving a wide space between columns.
You probably noticed that the ruler also contains a small white triangle (although where it appears changes based on which column you’ve selected text in. That’s the indent marker, and it lets you control the interior indent on paragraphs in each column—the right indent for the left column and the left indent for the right column. If you’re interested in learning more about how to use indents, be sure to check out that guide to using rulers in Word we mentioned earlier. Indent control works the same whether you have multiple columns or just one. Just take note of that.
For any request or complaint, kindly make use of the COMMENT BOX
How To Set Up Column Width With The Columns Dialog Box
Just note that when you set a Word document to use multiple columns, Word assigns a default column width that depends on the number of columns you choose. Here are those default widths below...
One Column: 6.5″ width for the column. Most people are used to this standard setup when you start typing in a blank document with default page settings. Start with an 8.5″ width for the paper size, take away 1″ on either side for the default page margins, and you’re left with 6.5″ for the actual text.
Two Columns: 3″ width for each column, with a 0.5″ space between columns.
Three Columns: 1.83″ width for each column, with a 0.5″ space between columns and it goes on like that.
Word lets you have up to 13 columns, and the more you add, the less space each column gets.
Among all this column, you can just set the number of columns you want and go about your business. But, you can change things up if you want. Maybe you want smaller columns, with more space in between those columns. Or, maybe you two columns to be a similar size, and then have a smaller column off to the right.
Now, i will be showing you how to do all that using the “Columns” dialog box. This is the best way to set up columns if you don’t yet have any text in your document, or if you know the precise measurements you want to hit. Check it out below..
Read This: Trick To Get Windows 10 Upgrade/Updates on your Window 7&8 PC After Deadline
1. When using MS Word column dialog box, you have to switch to the “Layout” tab on the Ribbon. That’s where the column magic happens. Click the “Columns” button and a dropdown menu opens with a number of options.
2. Choose any of the numbers on the list to create that many columns with their default widths. Choose the “Left” or “Right” options to create a two-column layout where the column you chose (left or right) is smaller—about half the size of the other column. It’s the “More Columns” option we’re after here. Click that to set up your own custom column widths.
3. The “Columns” window that pops up lets you perform your customization. The “Presets” section contains the same options you saw on the “Columns” menu.
4. You can also use the “Number Of Columns” box to set a specific number of columns from 1 to 13. So, start by choosing how many columns you want.
5. Select the “Line Between” option to have Word put a vertical line between columns.
6. To actually adjust the column width. If you want your columns to all stay the same width as one another, you can just adjust the number in the “Width” box for column #1... Changes you make there apply to all columns, no matter how many you have. Same goes for spacing. Adjust the number in the “Spacing” box for column#1 to change the spacing between all columns.
7. Note that as you change one value (width or spacing), the other value changes as well. Bump up the width, and the spacing goes down. Bump up the spacing, and the width goes down. You only have so much page width to work with, after all. Here, we set the width down to 1″ and the spacing went up to 1.75″ to compensate.
If you want to control the width of each column individually (making some wider and some narrower), disable the “Equal Column Width” check box.
When you do that, the width and spacing boxes for each column become available, and you can change them however you see fit. Keep in mind that you still have a fixed page width to work with, so adjust the width or spacing for one column will cause the others to change. You may have to work with it a bit to get things how you want them.
See This Also: How to Prevent Windows 10 From Automatically Downloading Updates [Minimize Data Consumption]
Here, we’ve set up three columns. The first two are 2″ in width and the third is smaller at 1.5″. We left a .5″ spacing between all columns.
Note also that you don’t get to adjust spacing for your final column. This makes sense, because the spacing only happens between columns.
How To Change Column Width on the Fly with Word’s Rulers
Now that you’ve seen how to set up column widths using the dialog box , let’s take a look at how you can change them on the fly with the Word ruler. This method is great if you already have columns in your document and you want to play around with widths to see what looks right to you.
>>Firstly, you need to make sure that your document rulers are visible. If you can’t see them, switch to the “View” tab on the Ribbon, and then select the “Ruler” option. Word’s rulers are great for lining things up, keeping tabs on measurements, and controlling indentation and margins. You should really leave them on all the time.
>>Assuming you’ve already got your document set up for two or more margins, look at the horizontal ruler at the top of the page. You can see that there’s a gray space in the middle of the ruler between the two columns.
That represents the spacing between columns that we talked about in the previous section, and it’s defined by two margin markers (the upside-down “L”).
>>Dragging either one of the margin markers changes the size of the spacing, and the margins for the columns themselves. For example, if you slide the left margin marker to the left, the right maring marker automatically moves to the right, increasing the size of the spacing between those margins. The columns of text in your document change as you do this, too, giving you instant feedback on how the changes will look.
Here, we’ve dragged it it so the spacing is much greater than the default, leaving a wide space between columns.
You probably noticed that the ruler also contains a small white triangle (although where it appears changes based on which column you’ve selected text in. That’s the indent marker, and it lets you control the interior indent on paragraphs in each column—the right indent for the left column and the left indent for the right column. If you’re interested in learning more about how to use indents, be sure to check out that guide to using rulers in Word we mentioned earlier. Indent control works the same whether you have multiple columns or just one. Just take note of that.
For any request or complaint, kindly make use of the COMMENT BOX


Call girls in kuala lumpur
ReplyDeleteescorts services in kuala lumpur
hot indian call girls in kuala kuala lumpur
vip escorts services in kuala lumpur
Call/Whatsapp 0060167274151
http://callgirlsinkualalumpur.com/
Nice Blog...
ReplyDelete