


First of all, the full meaning of NAS is Network Attached Storage for home and business while Synology is dedicated to provide DiskStation NAS that offers RAID storage, storage for virtualization, backup, NVR, and mobile app support.
If you note that your Synology NAS drive is giving you problems, or you’re just upgrading to a whole new system, there are a few ways you can reset it, depending on the action you need it for.
Before i proceed on the steps, it’s a good idea to install the Synology Assistant app on your computer (which you can do from this page). It lets you view the status of your NAS drive without having access to the drive itself.
It’s also great to have if the IP address of your NAS drive changes when you reset it and you aren’t sure what the new IP address is. Now, let's proceed to the three methods of resetting your Synology NAS drive.
There are three ways to reset a Synology NAS:
1. Resetting just the network settings (which will also reset the admin login password)
2. Resetting and reinstalling DiskStation Manager (still keeping all your data intact)
3. Resetting everything (including erasing all data on the hard drives).
First of all, let's talk about "Resetting Network Settings"
See This : The Easiest Steps To Access Your Computer Hardrive With Your Smartphone
If you notice that your NAS drive is giving you some network issues, you can do a simple reset of just the network settings. This also resets your admin login password, and you’ll be prompted to create a new one after resetting the network settings . follow this below steps for resetting the network setting
>>Start by locating the reset button on the back of your NAS drive. It’s usually right next to the USB and Ethernet port(s).

>>Get a paper clip or a SIM card removal tool and hold down the reset button for about five seconds—until you hear a beep. Then let go immediately.
>>After that, fire up Synology Assistant, and then double-click your NAS drive to access it and login.
>>Now, "Sign In” by filling the username and password box.. The default username is “admin” and the default password is left blank.
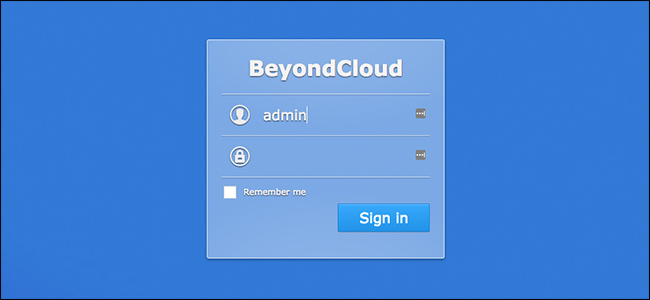
>>You’ll then be prompted to create a new password. Hit “Submit” when you’ve done that.
>>On the next screen, click the “Log in Now” button.
>>From there, just login with your new password and you’ll be back up and running!
That's all for the network settings
Now, How To Resetting and Reinstalling DiskStation Manager (still keeping all your data intact)
Read This: How To ByPass And Reset Password On Every Operating System
This will completely reset the DiskStation Manager "DSM" operating system, but still keeping all of their data intact on the hard drives—this is great for those upgrading to a new NAS box, or if DSM is just giving you some issues and you just want to wipe and start fresh. Be sure to create a backup of your configuration so that you can restore it after reinstalling, just follow this pretty steps carefully
>>Firstly, Locate the reset button on the back of your NAS drive. It’s usually right next to the ethernet port(s).
>>Now, Get a paper clip or a SIM card removal tool and hold down the reset button for about five seconds—until you hear a beep.
>>Immediately after that, hold down the reset button again for five seconds until you hear another beep. Let go immediately after that.
Then your NAS will beep a couple more times, and then the NAS drive will reboot. After a couple of minutes, the status light will blink orange. DSM is now ready to be reinstalled.

>>So just open up Synology Assistant, and then double-click your NAS drive (it will say “Configuration Lost” next to it) to access it.
>>Click the “Re-install” button.
>>Hit the green “Install Now” button.
>>Wait for the NAS to reinstall DSM and reboot itself. This usually takes 15 minutes or so, just wait.
>>When the NAS has rebooted, click the “Connect” button.
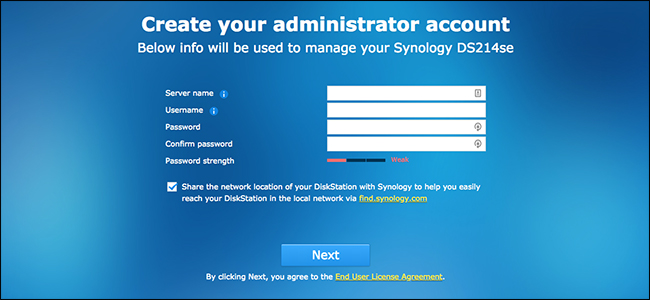
After that you can then create your admin account and go through the same setup process you did when you first got your NAS drive.
Now the last but not the least which is "Reset Everything and Erase All Data"
Erasing everything simply means deleting. If you want to go the more extreme route, you can completely reset everything, including wiping all data off the hard drives. This is also a bit easier to do since you can do this right from DSM, rather than having to deal with the physical reset button on the device. Before we proceed, I will advice you to back up everything first then follow these below steps to reset everything and erase all data.
>>Login to DSM (DiskStation Manager), and then open up the “Control Panel” window.
>>Click the “Update & Restore” option.
>>Switch to the “Reset” tab at the top.
>>Hit the red “Erase All Data” button.
>>When the pop-up window appears, check the box next to the red text, and then click the “Erase All Data” button.
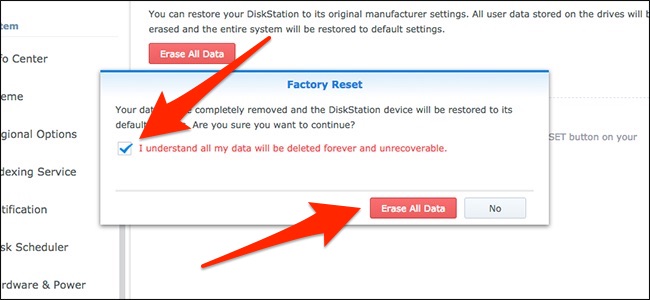
>>After that, enter in your admin login password and hit the “Submit” button.

Synology NAS will begin the reset process. This could take anywhere from 10-20 minutes, but once it’s done, you can fire up Synology Assistant and your NAS will indicate that it’s “Not Installed.” At that point, you’ve completely reset your device, then you can now set it up afresh
You can follow any of the three ways to factory reset your Synology NAS drive
For any request or complaint, kindly make use of the COMMENT BOX.
If you note that your Synology NAS drive is giving you problems, or you’re just upgrading to a whole new system, there are a few ways you can reset it, depending on the action you need it for.
Before i proceed on the steps, it’s a good idea to install the Synology Assistant app on your computer (which you can do from this page). It lets you view the status of your NAS drive without having access to the drive itself.
It’s also great to have if the IP address of your NAS drive changes when you reset it and you aren’t sure what the new IP address is. Now, let's proceed to the three methods of resetting your Synology NAS drive.
There are three ways to reset a Synology NAS:
1. Resetting just the network settings (which will also reset the admin login password)
2. Resetting and reinstalling DiskStation Manager (still keeping all your data intact)
3. Resetting everything (including erasing all data on the hard drives).
First of all, let's talk about "Resetting Network Settings"
See This : The Easiest Steps To Access Your Computer Hardrive With Your Smartphone
If you notice that your NAS drive is giving you some network issues, you can do a simple reset of just the network settings. This also resets your admin login password, and you’ll be prompted to create a new one after resetting the network settings . follow this below steps for resetting the network setting
>>Start by locating the reset button on the back of your NAS drive. It’s usually right next to the USB and Ethernet port(s).
>>Get a paper clip or a SIM card removal tool and hold down the reset button for about five seconds—until you hear a beep. Then let go immediately.
>>After that, fire up Synology Assistant, and then double-click your NAS drive to access it and login.
>>Now, "Sign In” by filling the username and password box.. The default username is “admin” and the default password is left blank.
>>You’ll then be prompted to create a new password. Hit “Submit” when you’ve done that.
>>On the next screen, click the “Log in Now” button.
>>From there, just login with your new password and you’ll be back up and running!
That's all for the network settings
Now, How To Resetting and Reinstalling DiskStation Manager (still keeping all your data intact)
Read This: How To ByPass And Reset Password On Every Operating System
This will completely reset the DiskStation Manager "DSM" operating system, but still keeping all of their data intact on the hard drives—this is great for those upgrading to a new NAS box, or if DSM is just giving you some issues and you just want to wipe and start fresh. Be sure to create a backup of your configuration so that you can restore it after reinstalling, just follow this pretty steps carefully
>>Firstly, Locate the reset button on the back of your NAS drive. It’s usually right next to the ethernet port(s).
>>Now, Get a paper clip or a SIM card removal tool and hold down the reset button for about five seconds—until you hear a beep.
>>Immediately after that, hold down the reset button again for five seconds until you hear another beep. Let go immediately after that.
Then your NAS will beep a couple more times, and then the NAS drive will reboot. After a couple of minutes, the status light will blink orange. DSM is now ready to be reinstalled.
>>So just open up Synology Assistant, and then double-click your NAS drive (it will say “Configuration Lost” next to it) to access it.
>>Click the “Re-install” button.
>>Hit the green “Install Now” button.
>>Wait for the NAS to reinstall DSM and reboot itself. This usually takes 15 minutes or so, just wait.
>>When the NAS has rebooted, click the “Connect” button.
After that you can then create your admin account and go through the same setup process you did when you first got your NAS drive.
Now the last but not the least which is "Reset Everything and Erase All Data"
Erasing everything simply means deleting. If you want to go the more extreme route, you can completely reset everything, including wiping all data off the hard drives. This is also a bit easier to do since you can do this right from DSM, rather than having to deal with the physical reset button on the device. Before we proceed, I will advice you to back up everything first then follow these below steps to reset everything and erase all data.
>>Login to DSM (DiskStation Manager), and then open up the “Control Panel” window.
>>Click the “Update & Restore” option.
>>Switch to the “Reset” tab at the top.
>>Hit the red “Erase All Data” button.
>>When the pop-up window appears, check the box next to the red text, and then click the “Erase All Data” button.
>>After that, enter in your admin login password and hit the “Submit” button.
Synology NAS will begin the reset process. This could take anywhere from 10-20 minutes, but once it’s done, you can fire up Synology Assistant and your NAS will indicate that it’s “Not Installed.” At that point, you’ve completely reset your device, then you can now set it up afresh
You can follow any of the three ways to factory reset your Synology NAS drive
For any request or complaint, kindly make use of the COMMENT BOX.


0 comments:
Post a Comment