


I bet you, most people using Microsoft word only knows how to save their document in text and not knowing how to convert it to web page. Their are some tools in which you can use to convert your new or existing documents into web page which we are going to take a look at today.
Today, we will be using MS Word 2016 to give you the steps though the web page of a thing is also in the older version of MS Word but we are just going to use the Word 2016 because that's automatically the latest word, though you might not be able to find all the features in Word 2016 in the Older version but if you can use idea, you will still be at the pitch. Not that you will not be able to convert your document to webpage in the older version, you will but you might not get all the features in word 2016 in the older version. Let's start with the steps on how to save your document as a web page before moving on to the branches that is attached to it
How to Save Your Document as a Web Page
>>Firstly open up the document you’d like to save as a web page.
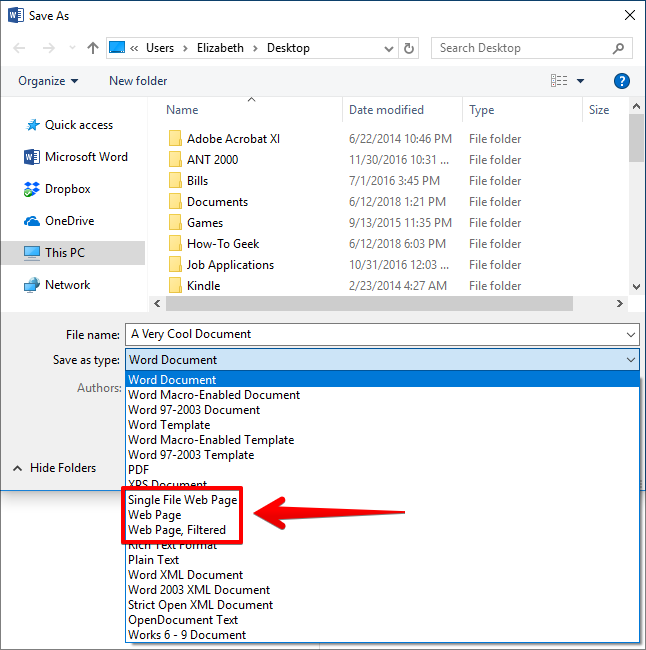
>>On the File menu, choose the “Save As” command, and then click the “Browse” option.
>>In the Save As window, navigate to where you’d like to store your file then type a name for your page into the “File Name” box. Though if you had saved previously, it will had gotten a default name.

Read This: How To Adjust Column Size In Microsoft Word(MS Word)
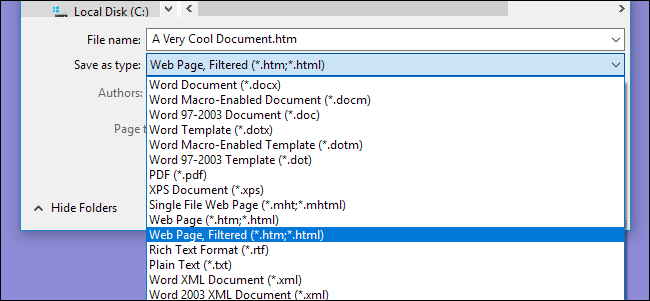
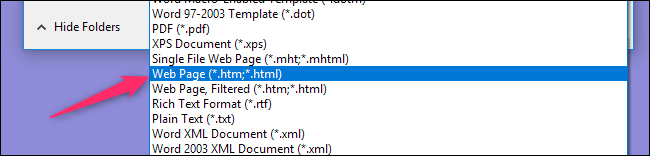
>>Click the “Save As Type” drop down menu. On the menu, you’ll find three options for saving your document as a web page: Single File Web Page; Web Page; and Web Page, Filtered.
NOTE: Using all of these options will surely convert your document to HTML (Hypertext Markup Language), the standard for displaying text on a web page. However, each file type produces a slightly different kind of HTML file. I can't choose for you, you are the one to choose by yourself which one to use among the three, I will be showing you what each of them does so you can now choose you preferred after going through what they does.
Now am showing you what this three option of web page does, let's take it one after the other.
SAVING YOUR DOCUMENT AS A FILTERED WEB PAGE
This one is good for those people that does not plan converting their web page back to word document, this preserves your document’s content and formatting, the problem is just that it brings out some HTML that you don't just need and keeps the file size small. Out of all the web page, the filtered web page gives you the cleanest code and fastest page loading time for your web page.
To continue saving your document as filtered web page, follow these steps below
>>In the Save as Type drop down, click the Web Page and make use of the Filtered webpage” option.
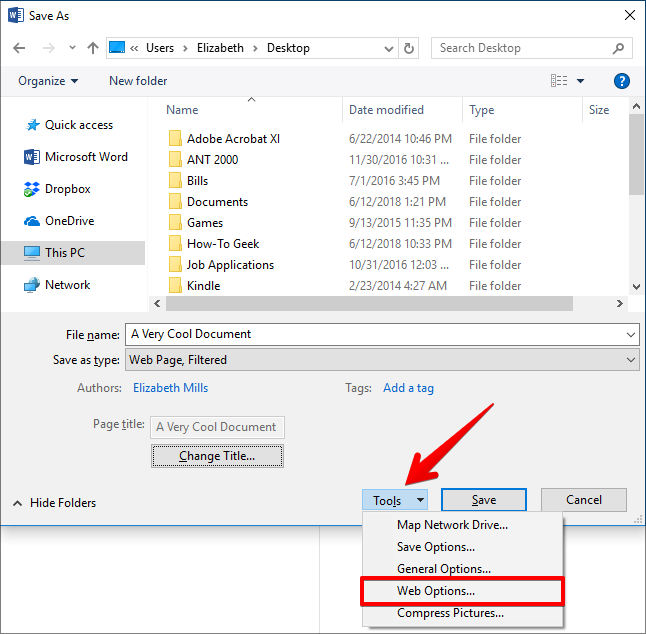
>>After that, click the “Change Title” button, you can do that in the menu that appears, type a title for your web page, and then click the “OK” button.
>>Once you do that, a warning box appears asking if you’re sure you want to convert the document to an HTML file, then Click the “Yes” button.
Now, you are good to go, you now have a web page saved to your chosen location. You can make a check by loading it up in your browser to check it out, or upload it to your web site. Note that Word saves the actual html file in whatever folder you selected as default and all the supporting images on the page to a subfolder. You will also need to upload that folder of images to your website also
SAVE YOUR DOCUMENT AS A WEB PAGE
This web page option is just a little bit different from the filtered, The “Web Page” option saves your web page as an HTML file and saves any supporting images into their own subfolder. Instead of filtering a document out on the "web page" option, it's preserves as much of Word’s formatting and extra document information as possible. unlike the filtered web page which its file size is small, the "Web Page" option own is slightly larger
Once you had saved your document as a "Web Page", trying checking it and see if it really saves the specific types of formatting you need on your page
SAVE YOUR DOCUMENT AS A SINGLE FILE WEB PAGE
As for the “Single File Web Page” option, it save all possible formatting information, very similar to the “Web Page” option, the little difference among the two is that the single file page saves all your supporting images and the page itself as part of the same HTML file instead of saving images into a separate folder unlike the "Web Page" Option
This "Single File Web Page" option file text is much more larger and It can be handy for keeping track of pages where you might forget to bring along the separate supporting files. As for the size, sometimes the resulting file size is close to a combination of the size of the page and supporting files (like images). But sometimes, the files can get quite a bit bigger, it depends on the document you want to convert. For those that are planning page as part of their web site, this is really not the best option and is not where you can expect pages to load quickly. It only useful in term of sharing a document with someone who has no other way to read a Word file like PDF or WPS.
As for the blogger, you can publish a word document directly to your blog by making use of the Word Sharing features but that is aside, we are not going into details about that, just letting you know that it's possible to publish word document directly to your blog.
Do you know it's possible to configure additional web options? YES, it possible. Now, I will be showing you how to configure additional web options
Recommended: How To Position Or Indent Paragraphs In Google Document
How to Configure Additional Web Options
This is just taking about customization on how documents are saved as web pages. If you want to start this or get these options...
>>In the Save As menu, open the “Tools” dropdown, and then click the “Web Options” button.
On this, you are only privilege with the features of five tabs for configuring various settings on how web pages get saved.
Below are the featured five tabs and the kinds of things you can configure on these tabs
1. Files tab: This controls and organise the storage of your files like your image saved on it's own folder once it's turned on but once it's turned off, it saves file to the same folder on the web page. Some other things it does by configuring whether long file names are used and whether Word updates links when you save the document.
2. Pictures tab: This is a screen controller for the screen size and density and to target browser. Images and text can wrap differently depending the video resolution at which they’re viewed. The default setting is probably good enough, since you’re not really going to be using Word to create sophisticated web sites. But if you open up your web page and all the text wraps around images in strange ways, this is the option to play with.
3. Fonts tab: The font tab allows you to select a specific font and character set on the page you are currently using.Though some people don't like using different font on their browser because it makes it look weird but changing character sets for readers of different languages might be useful. If you see someone that changes the font of is browser often, you can never know the browser he his using
4. Browser tab: This section makes you get a compatible browser when browsing, it's capable to turn PNG to a graphics format, rely on CSS for font formatting, and provides a few other small options.
5. Encoding tab: The Encoding tab only allows you to change the language that the page is encoded in.
Looking at the tab option I showed you now, you will see that important to know because these options are set on a per document basis. The sweetest part is that if you save any of this as a default settings, you document save along side with it will surely retain the settings and also other document that are yet to be saved on it. For any request or complaint, kindly make use of the COMMENT BOX
Today, we will be using MS Word 2016 to give you the steps though the web page of a thing is also in the older version of MS Word but we are just going to use the Word 2016 because that's automatically the latest word, though you might not be able to find all the features in Word 2016 in the Older version but if you can use idea, you will still be at the pitch. Not that you will not be able to convert your document to webpage in the older version, you will but you might not get all the features in word 2016 in the older version. Let's start with the steps on how to save your document as a web page before moving on to the branches that is attached to it
How to Save Your Document as a Web Page
>>Firstly open up the document you’d like to save as a web page.
>>On the File menu, choose the “Save As” command, and then click the “Browse” option.
>>In the Save As window, navigate to where you’d like to store your file then type a name for your page into the “File Name” box. Though if you had saved previously, it will had gotten a default name.
Read This: How To Adjust Column Size In Microsoft Word(MS Word)
>>Click the “Save As Type” drop down menu. On the menu, you’ll find three options for saving your document as a web page: Single File Web Page; Web Page; and Web Page, Filtered.
NOTE: Using all of these options will surely convert your document to HTML (Hypertext Markup Language), the standard for displaying text on a web page. However, each file type produces a slightly different kind of HTML file. I can't choose for you, you are the one to choose by yourself which one to use among the three, I will be showing you what each of them does so you can now choose you preferred after going through what they does.
Now am showing you what this three option of web page does, let's take it one after the other.
SAVING YOUR DOCUMENT AS A FILTERED WEB PAGE
This one is good for those people that does not plan converting their web page back to word document, this preserves your document’s content and formatting, the problem is just that it brings out some HTML that you don't just need and keeps the file size small. Out of all the web page, the filtered web page gives you the cleanest code and fastest page loading time for your web page.
To continue saving your document as filtered web page, follow these steps below
>>In the Save as Type drop down, click the Web Page and make use of the Filtered webpage” option.
>>After that, click the “Change Title” button, you can do that in the menu that appears, type a title for your web page, and then click the “OK” button.
>>Once you do that, a warning box appears asking if you’re sure you want to convert the document to an HTML file, then Click the “Yes” button.
Now, you are good to go, you now have a web page saved to your chosen location. You can make a check by loading it up in your browser to check it out, or upload it to your web site. Note that Word saves the actual html file in whatever folder you selected as default and all the supporting images on the page to a subfolder. You will also need to upload that folder of images to your website also
SAVE YOUR DOCUMENT AS A WEB PAGE
This web page option is just a little bit different from the filtered, The “Web Page” option saves your web page as an HTML file and saves any supporting images into their own subfolder. Instead of filtering a document out on the "web page" option, it's preserves as much of Word’s formatting and extra document information as possible. unlike the filtered web page which its file size is small, the "Web Page" option own is slightly larger
Once you had saved your document as a "Web Page", trying checking it and see if it really saves the specific types of formatting you need on your page
SAVE YOUR DOCUMENT AS A SINGLE FILE WEB PAGE
As for the “Single File Web Page” option, it save all possible formatting information, very similar to the “Web Page” option, the little difference among the two is that the single file page saves all your supporting images and the page itself as part of the same HTML file instead of saving images into a separate folder unlike the "Web Page" Option
This "Single File Web Page" option file text is much more larger and It can be handy for keeping track of pages where you might forget to bring along the separate supporting files. As for the size, sometimes the resulting file size is close to a combination of the size of the page and supporting files (like images). But sometimes, the files can get quite a bit bigger, it depends on the document you want to convert. For those that are planning page as part of their web site, this is really not the best option and is not where you can expect pages to load quickly. It only useful in term of sharing a document with someone who has no other way to read a Word file like PDF or WPS.
As for the blogger, you can publish a word document directly to your blog by making use of the Word Sharing features but that is aside, we are not going into details about that, just letting you know that it's possible to publish word document directly to your blog.
Do you know it's possible to configure additional web options? YES, it possible. Now, I will be showing you how to configure additional web options
Recommended: How To Position Or Indent Paragraphs In Google Document
How to Configure Additional Web Options
This is just taking about customization on how documents are saved as web pages. If you want to start this or get these options...
>>In the Save As menu, open the “Tools” dropdown, and then click the “Web Options” button.
On this, you are only privilege with the features of five tabs for configuring various settings on how web pages get saved.
Below are the featured five tabs and the kinds of things you can configure on these tabs
1. Files tab: This controls and organise the storage of your files like your image saved on it's own folder once it's turned on but once it's turned off, it saves file to the same folder on the web page. Some other things it does by configuring whether long file names are used and whether Word updates links when you save the document.
2. Pictures tab: This is a screen controller for the screen size and density and to target browser. Images and text can wrap differently depending the video resolution at which they’re viewed. The default setting is probably good enough, since you’re not really going to be using Word to create sophisticated web sites. But if you open up your web page and all the text wraps around images in strange ways, this is the option to play with.
3. Fonts tab: The font tab allows you to select a specific font and character set on the page you are currently using.Though some people don't like using different font on their browser because it makes it look weird but changing character sets for readers of different languages might be useful. If you see someone that changes the font of is browser often, you can never know the browser he his using
4. Browser tab: This section makes you get a compatible browser when browsing, it's capable to turn PNG to a graphics format, rely on CSS for font formatting, and provides a few other small options.
5. Encoding tab: The Encoding tab only allows you to change the language that the page is encoded in.
Looking at the tab option I showed you now, you will see that important to know because these options are set on a per document basis. The sweetest part is that if you save any of this as a default settings, you document save along side with it will surely retain the settings and also other document that are yet to be saved on it. For any request or complaint, kindly make use of the COMMENT BOX


0 comments:
Post a Comment