


Including a picture or other representation items to a Word document is straightforward, yet positioning those articles and inspiring them to stay where you need them can be disappointing. Fortunately Word has the apparatuses to make this more reasonable on the off chance that you know where to look. let's take a look at this and take a speedy visit.
Before we proceed on those positioning tools to position you pictures or other instruments, you need to recognize what is content wrapping so you can comprehend what we are stating. As a matter of course, when you insert pictures and other outline objects into your document, Word applies one of two types of content wrapping: "in line with text" (for pictures and most other illustration objects) or "in front of text" (for shapes and 3D models).
When you set a object text wrapping to be "in linewith text", Word regards the object being referred to as a text character. In the event that you compose or paste message previously or after the question, it moves along the line and down the page simply like some other text character. When you set a object text wrapping to be in front of the text, the object appears on top of any text, and you can move it to any position you need.
Read This: Step by Step to Link or Embed an Excel Worksheet in
a Word Document
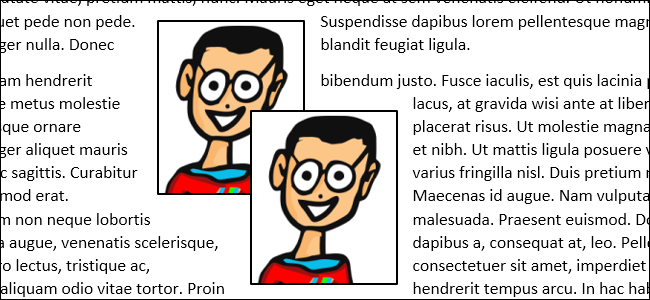
Here, we're utilizing an object for which we've set the text wrapping to "square." The positioning tools we'll be discussing apply to whatever kind of text wrapping you're utilizing, yet the correct positioning you're ready to perform will rely upon what text wrapping you've picked.
Now let's go straight to the point...let’s talk about those positioning tools.
Firstly, How to Open and Use the Position Menu
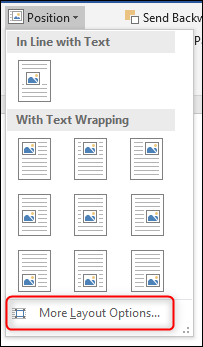
Open your document >>select the question with which you need to work, change to the "Layout" menu, and after that tap the "Position" button. That button likewise shows up on the "Format" menu of the Ribbon and works a similar way.

The Position drop-down menu is separated into two areas: "In Line With Text" and "With Text Wrapping."

Do you know that the "In Line with text" section just offers the single default choice, and this is what that looks like below, let's roll it..
The nine alternatives in the "With Text Wrapping" area let you select a settled position on the page for your object, running from the upper left corner to buttom right corner.

Since we've chosen a position our picture will remain there regardless of how the text changes. You can erase text from that paragraph, adjust paragraph, include new text, or whatever else you have to do and that picture will stay at the position you chose.

Simply take note of that choosing the whole paragraph to which the object is anchored will normally choose the question too. In this way, in the event that you select and afterward delete that paragraph, you'll erase that object, as well.
On the off chance that you need to erase the paragraph without deleting the object, you can choose the entire section and afterward Ctrl-tap the object deselect it. Deleting the paragraph will then abandon the object. You can likewise drag an object to another area, and it will remain settled in that new area.
Tweaking/Tuning and Other Options to Your Own Taste Position
This fundamental preset function well for basic(simple) positioning, and you can drag your object a particular place in the event that you need. Be that as it may, imagine a scenario in which you need to put two pictures a set sum apart, or keep your picture a specific separation from the edges. Word gives a palette of alternatives you can use to adjust a object position. Now let's start..
Select your object, Go to the Layout >> Position, and this time tap the "More Layout Options" command.
The Layout window should open with the "Position" tab chosen.
Here you can tweak to your heart's content. To do that, begin with the Alignment option. These two choices (one for horizontal and one for vertical arrangement) control how the question is adjusted in relation to parts of the document.

On the off chance that you need those arrangements estimated with respect to an option that is other than the page margin, you can pick distinctive choices starting from the drop menus to one side of every choice.
In the "horizontal" section, you'll likewise see a "book layout" choice, which is utilized when your document is in a left page/right page arrange for printing and binding. The alternatives here are very basic. You can position your question in respect to either within or outside of the margin or page. These alternatives work couple with the Layout > Margin option, particularly the "mirrored" option.
Finishing the set are "Absolute position" and "Relative position" in both the "horizontal" and "Vertical" section. These alternatives give you considerably better control over the particular position of a object. Picking an "absolute position" implies your object will remain in that correct position regardless of what other formatting or text you may change. A "Relative position" implies your object will be set in respect to a part of the document structure so if that part of the document moves, your picture moves with it and remains in a similar relative position. This is helpful when you need your picture to dependably be a sure separation far from a margin, like if you change the margin later, it won't have any effect.
Read also:MicroSoft Package: The Best Microsoft Excel
Keyboard Shortcut You Need To Know
Looking Into Overlapping Of Images
This is how you can cover/overlap your pictures, Underneath the "Horizontal" and "Vertical" areas in the Layout window, you'll additionally locate a couple of different options. We should begin with the "Allow cover" option since that is really simple and furthermore exceptionally valuable.
On the off chance that you have in excess of one object in your document and you need some to have the capacity to cover with others, you have to do this, Guess it, enable the"Allow Overlap" option. This is a "whole document" setting, which implies it influences each object in the document, not simply the question that you had chosen when you turned the setting on. This bodes well looking at the situation objectively, in light of the fact that for what reason would you ever turn this on for one picture yet no others? Like every positioning option, "Allow Overlap" just applies to pictures which aren't utilizing the "In line with text" wrapping style. Once you've turned it on you can drag your pictures around to cover how you need.

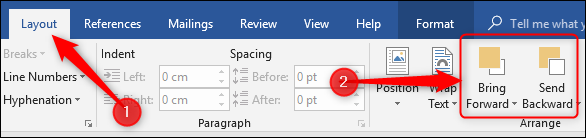
In the event that you need to change which picture is before the other, change to the "Layout" (or "Format") tab and utilize the "Bring Backward" and "Send Backward" option to layer the pictures the manner in which you need.
Knowing the "Lock Anchor" and "Move Object With Text" Options then Know How To Use them
This segment usually cause confussion among word users so we will make sure we explain into detail for full understanding
Now, when you begin exploring different avenues regarding these two options, you may see that very little happens regardless of which you pick. That is on account of these choices just influence questions that don't have a settled position. When you changed your picture from "In line with text" to an alternate content wrapping style, a setting was empowered that you most likely missed except if you unequivocally searched for it. This setting is classified under "Fix Position on Page," and you can discover it on the Layout >> Wrap Text menu.
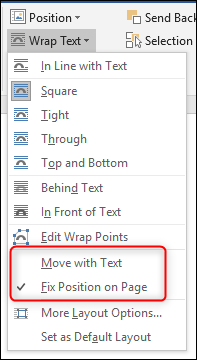
When you have the "Fix Position On Page" alternative turned on, the "Move object with text" and "Lock Anchor" option in that Layout window don't do anything. Those option just work if the picture is permitted to move. To utilize them, you need to turn "Move With Text".
This is where the confusion is, you have to know thst there is different between"Move With Text" on the Wrap Text menu and the "Move Object With Text" option in the format window.
Simply head to the "Move With Text" option on the Wrap Text menu and afterward come back to the Layout window.
We should begin with the "Move Object With Text" menu This setting decides if the object will move with the section to which it's anchored. In the event that this setting is exchanged on, you can include or delete paragraph over the one containing your question and the object moves alongside its own section.
At the point when "Move object with text" is turned on, the picture remains with the first section when we include another paragraph above.

Be that as it may, when "Move object with text" is turned off, the picture stays where it is on the page when we include another section above.
This conveys us to the manner in which that Word mork a question as having a place with a specific section, Word does this by utilizing a "anchor." You can see the anchor when you select a picture.
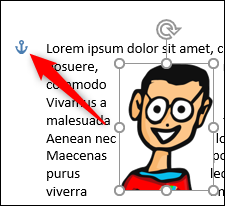
Note: If you can't see the anchor option then go to File > Options > Display and ensure "anchor object" is turned on
Normally, the anchor is attached to the paragraph you into which you insert the object, but when you move the object to another paragraph, the anchor moves with it.
So now, you know Word can handle images also. For any request or complaint, kindly make use of the COMMENT BOX
Before we proceed on those positioning tools to position you pictures or other instruments, you need to recognize what is content wrapping so you can comprehend what we are stating. As a matter of course, when you insert pictures and other outline objects into your document, Word applies one of two types of content wrapping: "in line with text" (for pictures and most other illustration objects) or "in front of text" (for shapes and 3D models).
When you set a object text wrapping to be "in linewith text", Word regards the object being referred to as a text character. In the event that you compose or paste message previously or after the question, it moves along the line and down the page simply like some other text character. When you set a object text wrapping to be in front of the text, the object appears on top of any text, and you can move it to any position you need.
Read This: Step by Step to Link or Embed an Excel Worksheet in
a Word Document
Here, we're utilizing an object for which we've set the text wrapping to "square." The positioning tools we'll be discussing apply to whatever kind of text wrapping you're utilizing, yet the correct positioning you're ready to perform will rely upon what text wrapping you've picked.
Now let's go straight to the point...let’s talk about those positioning tools.
Firstly, How to Open and Use the Position Menu
Open your document >>select the question with which you need to work, change to the "Layout" menu, and after that tap the "Position" button. That button likewise shows up on the "Format" menu of the Ribbon and works a similar way.
The Position drop-down menu is separated into two areas: "In Line With Text" and "With Text Wrapping."
Do you know that the "In Line with text" section just offers the single default choice, and this is what that looks like below, let's roll it..
The nine alternatives in the "With Text Wrapping" area let you select a settled position on the page for your object, running from the upper left corner to buttom right corner.
Since we've chosen a position our picture will remain there regardless of how the text changes. You can erase text from that paragraph, adjust paragraph, include new text, or whatever else you have to do and that picture will stay at the position you chose.
Simply take note of that choosing the whole paragraph to which the object is anchored will normally choose the question too. In this way, in the event that you select and afterward delete that paragraph, you'll erase that object, as well.
On the off chance that you need to erase the paragraph without deleting the object, you can choose the entire section and afterward Ctrl-tap the object deselect it. Deleting the paragraph will then abandon the object. You can likewise drag an object to another area, and it will remain settled in that new area.
Tweaking/Tuning and Other Options to Your Own Taste Position
This fundamental preset function well for basic(simple) positioning, and you can drag your object a particular place in the event that you need. Be that as it may, imagine a scenario in which you need to put two pictures a set sum apart, or keep your picture a specific separation from the edges. Word gives a palette of alternatives you can use to adjust a object position. Now let's start..
Select your object, Go to the Layout >> Position, and this time tap the "More Layout Options" command.
The Layout window should open with the "Position" tab chosen.
Here you can tweak to your heart's content. To do that, begin with the Alignment option. These two choices (one for horizontal and one for vertical arrangement) control how the question is adjusted in relation to parts of the document.
On the off chance that you need those arrangements estimated with respect to an option that is other than the page margin, you can pick distinctive choices starting from the drop menus to one side of every choice.
In the "horizontal" section, you'll likewise see a "book layout" choice, which is utilized when your document is in a left page/right page arrange for printing and binding. The alternatives here are very basic. You can position your question in respect to either within or outside of the margin or page. These alternatives work couple with the Layout > Margin option, particularly the "mirrored" option.
Finishing the set are "Absolute position" and "Relative position" in both the "horizontal" and "Vertical" section. These alternatives give you considerably better control over the particular position of a object. Picking an "absolute position" implies your object will remain in that correct position regardless of what other formatting or text you may change. A "Relative position" implies your object will be set in respect to a part of the document structure so if that part of the document moves, your picture moves with it and remains in a similar relative position. This is helpful when you need your picture to dependably be a sure separation far from a margin, like if you change the margin later, it won't have any effect.
Read also:MicroSoft Package: The Best Microsoft Excel
Keyboard Shortcut You Need To Know
Looking Into Overlapping Of Images
This is how you can cover/overlap your pictures, Underneath the "Horizontal" and "Vertical" areas in the Layout window, you'll additionally locate a couple of different options. We should begin with the "Allow cover" option since that is really simple and furthermore exceptionally valuable.
On the off chance that you have in excess of one object in your document and you need some to have the capacity to cover with others, you have to do this, Guess it, enable the"Allow Overlap" option. This is a "whole document" setting, which implies it influences each object in the document, not simply the question that you had chosen when you turned the setting on. This bodes well looking at the situation objectively, in light of the fact that for what reason would you ever turn this on for one picture yet no others? Like every positioning option, "Allow Overlap" just applies to pictures which aren't utilizing the "In line with text" wrapping style. Once you've turned it on you can drag your pictures around to cover how you need.
In the event that you need to change which picture is before the other, change to the "Layout" (or "Format") tab and utilize the "Bring Backward" and "Send Backward" option to layer the pictures the manner in which you need.
Knowing the "Lock Anchor" and "Move Object With Text" Options then Know How To Use them
This segment usually cause confussion among word users so we will make sure we explain into detail for full understanding
Now, when you begin exploring different avenues regarding these two options, you may see that very little happens regardless of which you pick. That is on account of these choices just influence questions that don't have a settled position. When you changed your picture from "In line with text" to an alternate content wrapping style, a setting was empowered that you most likely missed except if you unequivocally searched for it. This setting is classified under "Fix Position on Page," and you can discover it on the Layout >> Wrap Text menu.
When you have the "Fix Position On Page" alternative turned on, the "Move object with text" and "Lock Anchor" option in that Layout window don't do anything. Those option just work if the picture is permitted to move. To utilize them, you need to turn "Move With Text".
This is where the confusion is, you have to know thst there is different between"Move With Text" on the Wrap Text menu and the "Move Object With Text" option in the format window.
Simply head to the "Move With Text" option on the Wrap Text menu and afterward come back to the Layout window.
We should begin with the "Move Object With Text" menu This setting decides if the object will move with the section to which it's anchored. In the event that this setting is exchanged on, you can include or delete paragraph over the one containing your question and the object moves alongside its own section.
At the point when "Move object with text" is turned on, the picture remains with the first section when we include another paragraph above.
Be that as it may, when "Move object with text" is turned off, the picture stays where it is on the page when we include another section above.
This conveys us to the manner in which that Word mork a question as having a place with a specific section, Word does this by utilizing a "anchor." You can see the anchor when you select a picture.
Note: If you can't see the anchor option then go to File > Options > Display and ensure "anchor object" is turned on
Normally, the anchor is attached to the paragraph you into which you insert the object, but when you move the object to another paragraph, the anchor moves with it.
So now, you know Word can handle images also. For any request or complaint, kindly make use of the COMMENT BOX


0 comments:
Post a Comment